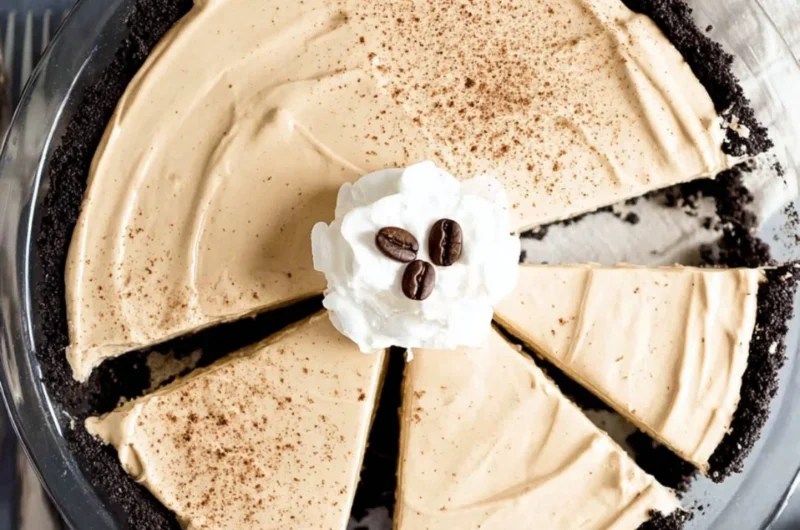
Indulge in the Creamy Delight of No-Bake Coffee Pie
As the winter chill wraps around us like a cozy blanket, there’s nothing quite like the comfort of a sweet dessert to warm the soul. And what better way to reminisce over warm coffee chats with loved ones than with this No-Bake Coffee Pie? It’s creamy, luscious, and bursting with rich coffee flavor—a perfect treat for any gathering or a little indulgence just for you. Every bite transports me back to those lovely afternoons in my grandmother’s kitchen, where the aroma of freshly brewed coffee mingled with sweet treats. Grab your apron and let’s create something special! This is one you’ll definitely want to pin for later!
Why You’ll Love This Recipe
- Quick and Easy: As a no-bake dessert, this pie comes together effortlessly, perfect for those busy weeknights or last-minute gatherings.
- Family-Friendly: It’s a great way to introduce kids to the world of baking (and coffee flavors!), making it a fun family activity.
- Rich and Creamy: With layers of whipped cream and sweetened condensed milk, this pie boasts a texture that’s simply divine.
- Coffee Lovers’ Dream: If you adore a good cup of coffee, this pie will take you on a heavenly flavor journey.
- Perfect for Every Occasion: Whether it’s a holiday celebration or a cozy weekend treat, this pie fits right in as a crowd-pleaser.
What You’ll Need
Gather These Simple Ingredients:
- 1 1/2 cups Oreo cookie crumbs
- 1/2 cup unsalted butter, melted
- 1 cup sweetened condensed milk
- 1 cup heavy cream
- 2 tablespoons espresso powder
- 1 teaspoon vanilla extract
How to Make No-Bake Coffee Pie
Let’s Make It Together:
- In a bowl, mix the Oreo cookie crumbs with melted butter until well combined. Press this mixture firmly into the bottom of a pie dish to form the crust.
- In a separate bowl, whip the heavy cream until stiff peaks form, creating that light and airy texture we all love.
- In another bowl, combine sweetened condensed milk, espresso powder, and vanilla extract. Mix until smooth—it should be a silky, fragrant mixture.
- Gently fold the whipped cream into the espresso mixture until well incorporated. This is where your filling becomes wonderfully creamy!
- Pour the filling into the prepared crust and spread it evenly, letting the crust do its delicious job.
- Freeze the pie for at least 4 hours or until firm—trust me, the wait will be worth it!
- Serve chilled, slice, and enjoy every luscious bite!
Delicious Variations to Try
- Mocha Delight: Add a layer of chocolate ganache on top for a rich, indulgent twist that chocolate lovers will adore.
- Nutty Overload: Fold in some chopped walnuts or hazelnuts for a delightful crunch that complements the creamy filling beautifully.
- Minty Fresh: Stir in a few drops of mint extract into the filling for a refreshing peppermint flavor, perfect for holiday celebrations.
- Decadent Toppings: Drizzle your pie with caramel sauce or sprinkle shaved chocolate on top for an elegant finishing touch.
Chef Emma’s Helpful Tips
- Make-Ahead Magic: Feel free to make this pie a day in advance. Its flavors deepen and it stays perfectly chilled, making it even more delightful!
- Ingredient Swaps: Want a different flavor? Use chocolate sandwich cookies instead of Oreos for the crust, or try vanilla extract for a creamier pie.
- Slicing Secrets: To make slicing easier, dip your knife in warm water before cutting each piece. This way, you’ll get clean, beautiful slices.
- Storage Suggestions: Keep leftovers (if there are any!) in the freezer for up to a week. Just remember to let it thaw for a few minutes before serving.
What’s Inside – Nutrition Breakdown
- Serving Size: 1 slice
- Calories: 350
- Carbohydrates: 30g
- Sugar: 25g
- Fat: 22g
- Protein: 4g
- Sodium: 150mg
Frequently Asked Questions
Can I make this ahead?
Absolutely! This pie is perfect for making a day or two in advance. Just keep it stored in the freezer.
Can I use different ingredients?
Yes! Feel free to get creative with your crust or filling. Different flavored cookies or extracts can change things up delightfully.
How do I store leftovers?
Store unused pie in the freezer for up to a week, covering it well to prevent freezer burn.
How long does it last?
When stored properly in the freezer, it can last about a week, though I doubt it will last that long once you’ve had a taste!
A Cozy Closing Note
This No-Bake Coffee Pie isn’t just a dessert; it’s a warm hug from your kitchen that brings people together. There’s something incredibly special about sharing homemade treats with loved ones, especially when they’re as simple and delightful as this pie. Save this No-Bake Coffee Pie to your cozy dessert board so it’s ready when you need a comforting treat! Happy baking!
Print
No-Bake Coffee Pie
- Total Time: 255 minutes
- Yield: 8 servings 1x
- Diet: Vegetarian
Description
A creamy, luscious no-bake coffee pie that captures the rich flavors of coffee, perfect for any gathering or a cozy indulgence.
Ingredients
- 1 1/2 cups Oreo cookie crumbs
- 1/2 cup unsalted butter, melted
- 1 cup sweetened condensed milk
- 1 cup heavy cream
- 2 tablespoons espresso powder
- 1 teaspoon vanilla extract
Instructions
- Mix the Oreo cookie crumbs with melted butter until well combined. Press this mixture firmly into the bottom of a pie dish to form the crust.
- Whip the heavy cream in a separate bowl until stiff peaks form.
- Combine sweetened condensed milk, espresso powder, and vanilla extract in another bowl. Mix until smooth.
- Fold the whipped cream into the espresso mixture until well incorporated.
- Pour the filling into the prepared crust and spread it evenly.
- Freeze the pie for at least 240 minutes or until firm.
- Serve chilled, slice, and enjoy every luscious bite!
Notes
Feel free to make this pie a day in advance for deepened flavors. Leftovers can be stored in the freezer for up to a week.
- Prep Time: 15 minutes
- Cook Time: 0 minutes
- Category: Dessert
- Method: No-Bake
- Cuisine: American
Nutrition
- Serving Size: 1 slice
- Calories: 350
- Sugar: 25g
- Sodium: 150mg
- Fat: 22g
- Saturated Fat: 12g
- Unsaturated Fat: 10g
- Trans Fat: 0g
- Carbohydrates: 30g
- Fiber: 1g
- Protein: 4g
- Cholesterol: 60mg